How to Install the Cuid Smoke Detection SensorUpdated 4 months ago
Product Introduction
This product is an intelligent photoelectric smoke sensor, with ultra-low power consumption Zigbee wireless network technology design. It is able to real-time detect the presence of smoke, once it detects the fire danger, the red LED flashes rapidly and the detectors sound alarm once it detects the fire danger, can alert you and your family in a timely manner. It can be widely used in home, living room, coffee shop, ballroom and any other places that need fire alarm monitoring.

Technical specifications
- DCTV working voltage (CR17335/CR123A lithium battery)
- Alarm indication Red LED Sound level affidb/3m
- Zigbee networking mode
- Ad-Hoc network distance: s70m (open aια)
- Working temperature-10°C+50°C
- Working humidity 95%
- Dimensions 6060-40.2mm
Where to install the Safety Smoke Detection Sensor
Do not install the Sensor in places with high temperatures, high humidity, or heavy oil vapors, places near heavy oil paint, thinners or other suspended solids, such as kitchens, boiler rooms, heating areas or underground warehouses, as they may generate false alarms and damage the Sensor.
If, for example, you have a kitchen or other area with the potential to generate fires or smoke escapes, place the Sensor in the opposite corner or as far as you can from the stove or appliance that could generate smoke, so that daily heating does not damage the sensor.
Ultimately, make sure the sensor is close to, but not on, sensitive areas so it can stay cool and dry without losing its power to detect the presence of smoke.
In addition, we recommend that you always keep your surroundings clean.
These are the specific steps for each type of installation:
Flat roof mounting:
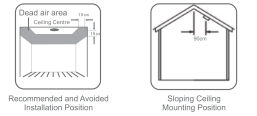
The preferred location to install the smoke sensor is in the center of the ceiling, because smoke, heat and combustible products rise to the ceiling and spread laterally. Keep at least 30cm away from lights or decorations and at least 15cm away from walls and corners.
Mounting on a sloped ceiling:
If the ceiling is sloped, install the smoke sensor at a horizontal distance of 90 cm from the top of the ceiling.

Step 1
Twist the sensor counterclockwise to separate it from the bracket. Strip the insulator from the dual battery to electrify the sensor.
Step 2
Add the device according to the App prompt. Press and hold the network button for 5 seconds: When the device enters network status, the green LED indicator will flash slowly first for about 3 seconds and then flash quickly.
The network is successfully connected when the on LED stays on for 3 seconds and then turns off; The App will indicate that the network connection was successful. If the network failed, the green LED flashes slowly for 3 seconds. then it turns off. The application will indicate that the network failed.

Step 3
• Installation one: Peel off the double-sided adhesive and stick the sensor to the ceiling.
• Installation two: fix the support to the ceiling using wall plugs and dowels (RECOMMENDED).
Note:
Installation with double-sided adhesive should pay attention to the following:
1. Make sure the installation surface is smooth, flat, stable, dry and clean.
2. After installation, periodically check whether the product is firmly adhered to the installation surface.
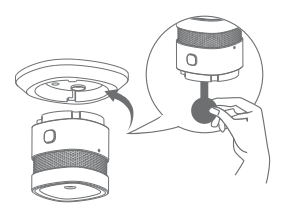
Step 4
Remove the insulating strip from the battery to turn on the detector and rotate the sensor clockwise on the bracket.
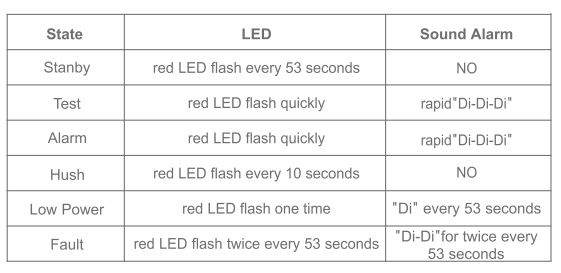
Led status and alarm.

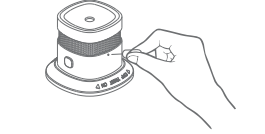
Mute function
Make sure there is no real danger of fire when using the mute function. If non-emergency smoke (e.g., steam) causes nuisance alarms, do not stop the alarm by blocking the smoke detector or in any other way. You can press the mute/test button to stop the alarm temporarily. (Ten minutes later, the smoke detector will work normally again)
Press and release the test button to test the sensor. The sensor will emit short, loud beeps. It means the smoke detector can work normally. The alarm may stop sounding once the test button is released. It is suggested to test the smoke detector at least once a month. Do not use an open flame to test this smoke alarm.
Battery replacement
Replace the battery correctly according to the positive and negative electrode. Dispose of the used battery in the correct way. Pay attention to environmental protection.
Maintenance
• Press the test button to test alarm devices weekly. After the devices are in use, inspect the alarm device; If any failure occurs (such as the bell does not ring, the LED does not light up), report it to the cuid customer service area.
• The battery can be used for 3-5 years under normal conditions; High temperatures, high humidity, or other poor conditions may shorten battery life.
Please change the battery timely when you receive low power indication. Press the test button: if the sensor makes a sound and the LED flashes, it means that the battery change was successful.
• Do not disassemble the sensors without the help of a specialized technician. If any problem occurs, report it to cuid's customer service area; It is suggested to change the battery after a real fire alarm occurs.
Warning
• This product is a smart smoke alarm for home use, which can make alarm sound and flash when fire occurs, but cannot put out fire.
Do you have any questions or queries? Contact us by WhatsApp at +52 56 2542 9432! We will be happy to help you.